Monday, August 24, 2009

8 Tips For Shooting Modern Super 8 #2 - 85 Filter


8 Tips For Shooting Modern Super 8 #2.... The 85 Filter Situation

Now here is a topic of controversy and conversation…the good old 85 filter. There are many differences of opinion about the 85 filter. This is ours at Pro8mm. – Rhonda

In the beginning, all super8 film was Tungsten Balanced, which means that the film will produce true colors under tungsten light. If you wanted to get correct colors in daylight, you had to use an orange filter called an 85 (sometimes called 85A). For convenience, every Super 8 camera was built with an internal 85 filter. The filter was usually in place because most filming was done outside in daylight. There were some clever ways to take out the filter when you were filming in Tungsten (Interior) light. The filter removal system could be activated by the super8 cartridges notch system, or by a switch, or by sticking something into a place in the camera to take it out or some combination of these things.
Every super 8 camera manufacturer had their own idea as to how this should be done. Today, you have dozens of super8 film stocks that can be either daylight or tungsten color balanced. When you film in daylight with daylight film, you do not want to use an 85 filter. At Pro8mm we have been taking the internal filters out of super8 cameras for many years now. When this is done correctly, it can greatly improve the optical performance of a camera. These inernal filters are often made of plastic which deteriorate over time and can greatly interfere with the quality of the image. They are also dirt magnets! Today because you can buy daylight film, it is actually inconvenient to have the internal 85 filter. Some film manufacturing companies prescribe to the cartridge notch for 85-filter removal and some do not. The standards for dealing with this 85 thing are a mess, so it is up to you, the filmmaker to understand what the 85 filter is and how your camera handles this. You need to make sure that you are using the correct film for your filming environment, daylight or tungsten. Although you can do some amazing color, correction in post, if you do not get this right you will never achieve the brilliance in color your images can have. In addition, all this correcting takes time, which cost money. What make this a little challenging is in most super8 cameras the 85 was placed behind the viewfinder optic where it can not be seen. If your camera has a switch or you can toggle between the two settings for filter in and out , you will not be able to see the effect of having the filter in by looking in the viewfinder.
You must open up the camera door where you insert the film and look through the camera body. Put your eye in line with what the film will see. You must run the camera in order to see through it. It also will help if you point the camera at something darker so the exposure system is open, or manually set the camera to keep the exposure wide open. Once you find a position where you can see light through the camera body, flip the switch that goes between the 85 filters in and out. You should see the light turn a darker orange when the filter is in. However, you are not done. Take the super8 cartridge you are about to use and put it in the camera. While doing so, look to see if it is flipping a lever in the camera. Now go back to check your camera and make sure that the position of the cartridge has not effected the switching. The other approach is to make sure all your settings are correct and the cartridge has the correct notch for the 85 filters. A cartridge with a notch for the 85 filters will not remove the filter automaticly. A cartridge without a notch will automatically remove the filter. In some cameras, an external switch can override this, but in others, if the notch removes the 85 filter it cannot be returned with the switch.
(c) Pro8mm ™ , by Phil Vigeant, 2009


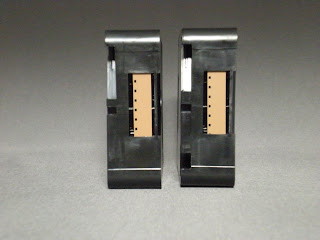
Cartridge on left is 7219 without 85 filter notch. On right, the notch added by Pro8mm
One thing you may find interesting in that we repackage the Kodak Vision 3 7219 which we call Pro8/19 ASA 500T with our prepaid processing and add the correct notch for the 85 filter. ($30 stock and processing…add a scan to Pro Ress that inclues prep and clean for one stop work flows with progressive discount, a yummy deal!) www.pro8mm.com
8 Tips for Shooting modern Super 8


I read allot about Super 8 in chat rooms and forums and I am always amazed how much misinformation there is. There seems to always be an on going battle between people trying to jockey themselves as the most informed expert. This wrong information and half truths hurts filmmakers. I checked on AMAZON.com and there is nothing on MODERN SUPER 8. The last book I found was written in 1981. So I though it would be helpful to have some tips for shooting modern Super 8.

Instead of giving you all 8 tips at once, I'll give them to you one at a time so that hopefully you will keep coming back and read my Super 8 blog! While some of the tips I am going to give you are “old school” common sense that any film maker working with super 8 or 16mm film should do/should have done at any time in their shooting career , some have to do directly with the new modern negative film stocks, our Max 8, 16 x 9 super 8 cameras and native 1080 HD scanning.


A Few tips can go a long way, by Phil Vigeant, owner and senior colorist at Pro8mm

“Parts of my job as senior colorist at Pro8mm, is that I get to scan about a million feet of super8 film each year. In doing so I get to see what is happening in the super8 world with some vantage point based on volume. I look at my work as a two-part job. One, as a creative colorist, trying to get the most information off of the frames for our customers, and second, as an inspector looking for bugs in the over all super8 process. When I see something that needs improving, I try to see what I can do with the technology at hand to facilitate a positive change. Internally, I can talk to my employees who are the people most responsible for each area and together we try to attack the issue. Externally, it is much more difficult. You have competitive concerns to address, and some companies just do not see these problems as issues the way I might. In addition, there are things that are totally beyond my control that can play a major roll in great looking super8 footage. These things are up to the filmmaker. Each year the technology for scanning film to digital seems to improve, resulting in more things that I can fix. Native 1080 HD film scanning now provides me with tremendous processing power to do many things that were impossible just a year ago. There are new things on the horizon as well, which will give us even greater ability to improve an imperfect image. However, there are a few things that if the filmmaker does not get right, there is very little that can be done to remedy the problem, no matter how much technology you have at hand.

As the years progress the problems seem to change and evolve with each new generation. For those who grew up with film as the main picture-taking medium some things were learned at every juncture of the photographic process. Things such as focus were so common knowledge of that generation that we often forget that this is knowledge that you have to learn. A colleague of mine who teaches film making here in California said that he has to spend days of the semester going over some of this basic stuff. Therefore, here is my short list 2009 of the 8 most common areas of concern I see every day in transferring film. I hope that a few quick tips and expatiation can help you create better images with your super8 camera.” – Phil Vigeant(c) 2009

TIP #1 HAIR IN THE GATE

Nothing is more aggravating for us and to you when we get absolutely gorgeous footage up on the scanner and there is a big yucky piece of dirt or hair in the frame. Just a small effort on your part will make your footage sparkle! BRUSH YOUR CAMERA GATE!

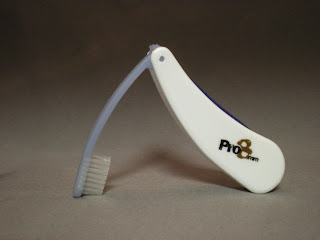
“Because of the nature of film and the way it travels through a camera and exposes each frame, the system will build up debris in the gate. If it is allowed to accumulate, this will block some of the image. The metal gate frames the film with what should be a smooth black border. Because you are running film over metal, it tends to leaves tiny deposits on the gate as the film passes over it. This emulsion residue is a gummy substance that is barely visible to the naked eye. If this is not cleaned from your camera, from time to time you can have several problems. First, the gummy glue can trap foreign substances like hair, lint, and dust and hold it firmly, often where the image is taken in a camera. This results in these ugly black globs which start around the boarder that blocks some of your image usually on the edges, but sometimes big enough to block a lot of picture. Depending on the size of these foreign obstacles, a hair in the gate can ruin a shot. In addition, the build up of emulsion can get so bad that your camera can physically scratch the film. The fix for these problems is very simple. Go to the store and purchase a child’s toothbrush. Gently brush a few strokes between every cartridge. Every, single, cartridge! It is amazingly simple but incredibly effective. Do not use compressed air as all that will do is blow dirt around, and it might blow debris into somewhere you cannot get it out. In addition, compressed air does not often have the force to move the object because remember, it is stuck in place. Do not use a Q-tip, as the chance of leaving a fiber of cotton is greater then the good you will do by performing the cleaning. If your camera has never been cleaned, you might need to do some more extensive work. Once it is clean, the brush trick is all that should be need to keep you hair free.

Pro8mm includes a free camera gate brush with every rental or purchase. They are also available for sale on our website for $5.00 at www.pro8mm.com. A nifty little tool that folds up small and has an attached cover, so you don’t have to worry about loosing it. Once you use it on your camera, we do not advise using it as a substitute for gum or mints when you have been on the set all day, or for that matter, the other way around! www.pro8mm.com

Tuesday, August 11, 2009

Grand Opening Of Our On Line Store


Customize your own package with multi format options, buy film and processing, a camera package, or just "play" with a quote. We have re-launched our on-line store. Look for products and specials in the days to come. Email us with feedback on what you would like to see, info@pro8mm.com.

Shop till you drop at Pro8mm!818-848-5522 2805 W. Magnolia Blvd., Burbank, CA 91505

www.pro8mm.com